What is \”Fake Son-Mother Gate\”?

![]()
Small-sized entrance doors can only be installed with a single door. They can be used as false double doors to decorate the exterior entrance doors to make the overall look more beautiful. Atmosphere.

![]()
Ordinary single door installation effect△

![]()
Fake letter door installation effect△

![]()
Comparison of the effects of ordinary doors and fake letter doors△
False sub-doors are divided into sub-doors and main doors. The main door can be opened and passed through. The sub-door is a decorative surface and cannot be opened. The surface is an extended facing and the inside is a solid wall.
The width of the decorative surface of the sub-door is about 1/2 the width of the main door.
Suitable for flat floors, hotel rooms, small offices and other places.

![]()
Darkmode △

![]()
Fake mother door△

![]()
Darkmode △

![]()
Fake child and mother door△
Fake child and mother door Door construction drawing:
The sub-door is a decorative surface and cannot be opened. The surface is an extended finish and the inside is a solid wall.

![]()
Fake double door construction drawing △

![]()
Fake double door construction drawing △

![]()
Fake double door construction drawing △

![]()
Dummy mother-door model diagram △

![]()
Fake mother door model diagram △
Note Matter:
① The wood base needs anti-termite treatment;
② It is recommended to choose invisible cross hinges;
③ The veneer of the false door is recommended to be consistent with the veneer of the parent door.

![]()
The wood base needs anti-termite treatment△

![]()
It is recommended to use invisible hinge △

![]()
It is recommended that the finish of the fake sub-door be consistent with the finish of the parent door△
Extended study of common door installation techniques:
Process flow:

![]()
1) Play the thread and find the rules:
After the structural project has passed the inspection and acceptance by the supervision station, the door and window installation construction can be carried out. First, a large wire should be hung vertically from the top floor to check the accuracy of the window position and pop up the installation position on the wall. Line, process the structural edges that do not conform to the line

![]()
2) Determine the installation location of door and window frames:
Check the height of the window frame installation based on the indoor horizontal line of 100cm, and deal with the structural edges that do not conform to the line.
3) Determine the installation elevation:
Indoor and outdoor door frames should be installed according to the elevation of the drawing location. To ensure a solid installation, check in advance whether the number of pre-embedded wooden bricks is sufficient. For a 1.2m high doorway, two wooden bricks should be embedded on each side. For doorways with a height of 1.2 to 2m, 3 wooden bricks should be embedded on each side. For doorways with a height of 2 to 3m, 4 wooden bricks should be embedded on each side. Two 10cm long wooden bricks should be nailed to each wooden brick. of nails, flatten the nail caps, and drive them into the wooden door frame along the wood grain.
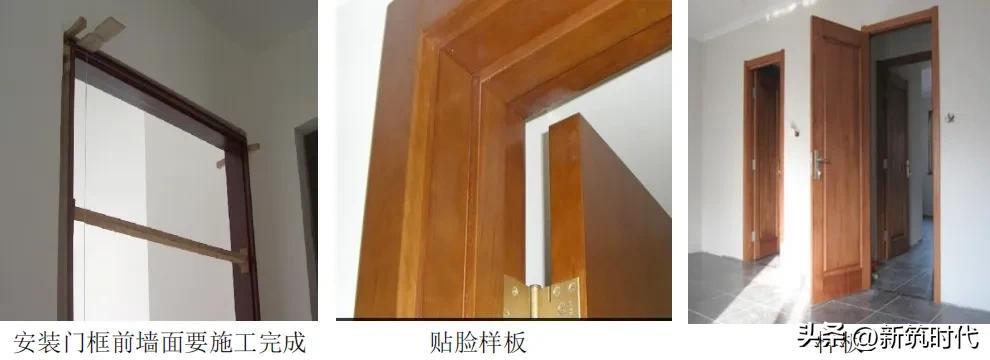
4) Installation template of sash and door frame:
Timber door frame installation should be carried out after floor work and wall construction
5) Make a sample:
Rotate the window sashInstall it on the window frame according to the requirements of the drawing. This process is called fan covering. For the quality of the cover fan, check the gap size, hardware installation position, size, model, and firmness according to the evaluation standards. If it meets the standard requirements, it will be used as a model. And use this as the acceptance criteria and basis.
![]()
6) Elastic wire installation of door and window frames:
The thickness of the plaster layer should be considered, and the installation position line should be drawn on the wall according to the size, elevation, position and opening direction of the door and window. The installation height of the window frame shall be based on the 50cm horizontal line on the wall. Use wooden wedges to temporarily fix the frame in the window opening. In order to ensure the straightness of the separated window frames, a small line should be pulled under the window frame to straighten it, and an iron level should be used. Introduce the flat line into the hole as a standard for erecting the frame, and then use a wire drop to correct the hanging straightness. Before installing the window frame, holes should be drilled in line with the position of the wooden bricks to facilitate nailing.

![]()
Lay out the door opening and determine the temporary fixation of the center line border △
7) Door leaf installation:
① First make sure the door is open Direction and hardware model, installation position, cutting position and opening direction of the double door fan (usually the right fan is a cover fan)
② Check whether the size of the door is correct; whether the corners are square and whether there are any stray corners. Check the height of the door should be measured on the two vertical sides of the door. Check the width of the door should be measured on the upper, middle and lower points of the door. , and draw lines at the corresponding parts of the fan.

![]()
Door opening measurement method△
③ Place the door leaf against the frame and draw the corresponding size line. If the leaf is large, the larger part should be planed off according to the size of the frame. If the leaf is small, wooden strips should be tied, and the wooden strips should be tied to the hinge side. , glue it and nail it with nails. The nail caps should be flattened., 1~2mm into the frame along the wood grain;
④ After the first trimming The door leaf should be able to be stuffed into the entrance. After stuffing, use wooden wedges to support it and temporarily fix it. According to the width of the gap between the door leaf and the edge of the door, draw the second trimming line and mark the position of the hinge groove (distance from the door leaf). The upper and lower ends of each 1/10, and avoid the upper and lower heads). At the same time, attention should be paid to the smooth installation of the door and the leaf;
⑤ The door leaf is planed for the second time, and the gap Once the dimensions are appropriate, install the hinges. You should first use a thread to draw out the width of the hinge. According to the requirements of 1/10 of the upper and lower protrusions, determine the hinge installation edge. Measure the length of the hinge from the upper and lower edge lines inward. Pick the hinge groove and use the groove. Depth to adjust the door leaf and the frame after installation. Lines should be left when planing the hinge groove, and should not be too large or too deep;
⑥ After the hinge grooves are cut out, install the upper and lower hinges. During installation, you should first tighten a screw, then close the door and check whether the gap is suitable? Check whether the mouth and fan are flat. If there are no problems, tighten all the screws. Wood screws should be driven in 1/3 of the way in, and screwed in 2/3. If the wooden door is made of yellow pine or other hardwood, holes should be drilled before installation. The hole diameter of the hole should be 0.9 times the diameter of the wood screw, and the hole depth should be 0.9 times the diameter of the screw. 2/3, drill holes before tightening the screws to prevent the installation from cracking or breaking the screws.

![]()
Cutting the hinge groove and installing the hinge△
⑦When installing a door leaf, you should measure the width of the door leaf with a ruler, and then determine the cutting depth of the center seam. If tongue and groove are used, the cutting depth and cutting direction of the joint should meet the requirements for locking, and then the surrounding areas should be planed to the exact size;
⑧ Hardware installation should comply with the requirements of the design drawings and must not be omitted. Generally, the height of door locks, bead bumpers, and handles at equal distances is 95 to 100 cm.

![]()
Install door locks and hardware△
⑨ After the door leaf is opened, it is easy to touch the wall. In order to fix the position of the door leaf, a door bumper should be installed. For closed doors with special requirements, a door leaf opener should be installed.

![]()
Door fixer △
Acceptance:
1) The fitting joints of the door cover should be tight, smooth and without black seams; the fixed accessories should be locked; the diagonal line of the door cover should be accurate, with an allowable tolerance of ≤1 mm within 2 meters and a tolerance of ≤1 mm above 2 meters. ≤1.5㎜;
2) After the door is set, it should be three-dimensional and vertical, with an allowable tolerance of +2mm for verticality and an allowable tolerance for horizontal straightness. +1㎜; there should be fixing screws between the door pocket and the wall (not less than 3 per linear meter); door pockets with a width of 200mm or more should be equipped with fixed iron sheets; the gap between the door pocket and the wall should be foamed The glue should be sealed on both sides. The foam glue should be applied evenly and cut smoothly after drying;
3) The size of the entire door is consistent with the size of the opening.
4) The wooden door should be flat, square and without warping. It meets the tolerance requirements (national standards).
5) The hinge installation is not skewed, holes are drilled according to the mold, and the keyhole position is accurate.
6) The door opens flexibly and without any abnormal noise.
The third hinge of the wooden door is installed using the golden section. The hinges sit three out of two, and the hinge grooves are of the same depth:

![]()
The surface of the wooden door is clean, without planing marks or hammer marks.
The corners are cut, the seams are tight and flat, and the hardware is complete.
Paneled doors and plywood doors have two ventilation holes at the top and bottom of the wooden door leaf. The two ventilation holes are reasonably set△

![]()
The door frame legs are made of stone boots to prevent the door frame legs from rot△

![]()
Wooden door accessories are installed carefully, door and window sashes should be installed firmly, and the hinge position should be accurate△

![]()
The glue seam on the door side is even and straight△

![]()
The surface of the wooden door is clean, without planing marks or hammer marks.
The corners and seams are cut tightly and evenly, and the door frames and fans are cut straight△
本站内容及图片来自网络,版权归原作者所有,内容仅供读者参考,不承担相关法律责任,如有侵犯请联系我们:609448834
![[Decoration design] Double door entrance, four bedrooms, two living rooms and two bathrooms, with a good view](/wp-content/themes/justnews/images/loading.png)